{"activeVersionTag":"latest","latestAvailableVersionTag":"latest","collection":{"info":{"_postman_id":"a25317b1-5952-4a35-9730-21c65a6dcc52","name":"FIWARE XML Agent","description":"[](https://github.com/FIWARE/catalogue/blob/master/iot-agents/README.md)\n[](https://fiware-ges.github.io/orion/api/v2/stable/) \n\nThis tutorial a wires up the dummy IoT devices which are responding using a custom [XML](https://www.w3.org/TR/xml11/)\nmessage format. A **custom IoT Agent** is created based on the IoT Agent Node.js\n[library](https://iotagent-node-lib.readthedocs.io/en/latest/) and the framework found in the\n[IoT Agent for Ultralight](https://fiware-iotagent-ul.readthedocs.io/en/latest/usermanual/index.html#user-programmers-manual)\ndevices so that measurements can be read and commands can be sent using\n[NGSI-v2](https://fiware.github.io/specifications/OpenAPI/ngsiv2) requests sent to the\n[Orion Context Broker](https://fiware-orion.readthedocs.io/en/latest/).\n\nThe tutorial uses [cUrl](https://ec.haxx.se/) commands throughout, but is also available as\n[Postman documentation](https://fiware.github.io/tutorials.Custom-IoT-Agent/)\n\nThe `docker-compose` files for this tutorial can be found on GitHub: \n\n [FIWARE 205: Creating a Custom IoT Agent](https://github.com/Fiware/tutorials.Custom-IoT-Agent)\n\n# Passing custom message formats\n\nAs defined previously, an IoT Agent is a component that lets a group of devices send their data to and be managed from a\nContext Broker using their own native protocols. Every IoT Agent is defined for a single payload format, although they\nmay be able to use multiple disparate transports for that payload.\n\nIoT Agents for many standard payloads exist, however it is possible to envisage that additional payloads may be needed\nas many potential sources of context data have already their own well-defined de-facto or de-jure standards for passing\ndata around systems. As an example the **ISOXML** standard\n[iso:11783](https://www.iso.org/obp/ui/#iso:std:iso:11783:-10:ed-2:v1:en) is frequently used with Agricultural\nMachinery.\n\nThe process for creating your own IoT Agent is relatively simple. It is best achieved through selecting an IoT Agent\nwhich uses the required data transport and rewriting/amending the payload processing code to handle the payloads in\nquestion.\n\nFor the purpose of this tutorial we will amend code from the existing Ultralight IoT Agent to process a similar custom\nXML format. A direct comparison of the two IoT Agents can be seen below:\n\n| IoT Agent for Ultralight | IoT Agent for JSON | Protocol's Area of Concern |\n| ------------------------------------------------------------------- | ------------------------------------------------------------------------------------- | -------------------------- |\n| Sample Measure `c\\|1` | Sample Measure ``
``
|\n| `` | Message Payload |\n| Sample Command `Robot1@turn\\|left=30` | Sample Command ``
`30`
`` | Message Payload |\n| Content Type is `text/plain` | Content Type is `application/xml` | Message Payload |\n| Offers 3 transports - HTTP, MQTT and AMPQ | Offers 3 transports - HTTP, MQTT and AMPQ | Transport Mechanism |\n| HTTP listens for measures on `iot/d` by default | HTTP listens for measures on `iot/xml` by default | Transport Mechanism |\n| HTTP devices are identified by parameters `?i=XXX&k=YYY` | HTTP devices are identified by payload `` | Device Identification |\n| HTTP commands posted to a well-known URL - response is in the reply | HTTP commands posted to a well-known URL - response is in the reply | Communications Handshake |\n| MQTT devices are identified by the path of the topic `/XXX/YYY` | MQTT devices are identified by the path of the topic `/XXX/YYY` | Device Identification |\n| MQTT commands posted to the `cmd` topic | MQTT commands posted to the `cmd` topic | Communications Handshake |\n| MQTT command responses posted to the `cmdexe` topic | MQTT commands posted to the `cmdexe` topic | Communications Handshake |\n\nAs can be seen, the supported communications transports (HTTP, MQTT, AMPQ) remain the same, it is processing of the\ncustom payload which will need to be adapted to ensure that the XML devices can communicate with the IoT Agent.\n\nIt should be noted that, depending on your use case, it also may be necessary to create an additional middleware for\ncommunications purposes. In this example the _devices_ are capable of sending measures and listening and responding to\ncommands directly on two separate comms channels. A different paradigm is used within the\n[LoRaWAN](https://fiware-lorawan.readthedocs.io) and [OPC-UA](https://iotagent-opcua.readthedocs.io) IoT Agents where an\nHTTP middleware responds to the IoT Agent, and it is then responsible for converting the communications to the\nlower-level CoAP transport used by the devices.\n\n## The teaching goal of this tutorial\n\nThe aim of this tutorial is to improve developer understanding of how to create their own custom IoT Agents, a series of\nsimple modificiations has been made to the code of the Ultralight IoT Agent demonstrating how to make changes. The\ntutorial consists of a walk-through of the relevant code and a series of HTTP requests to connect the new IoT Agent. The\ncode can be found within the current\n[GitHub Repository](https://github.com/FIWARE/tutorials.Custom-IoT-Agent/tree/master/iot-agent)\n\n## Reusing Common Functionality\n\nThe benefit of modifying an existing IoT Agent is that the developer will be able to reuse the common functionality\nfound across all IoT Agents. This includes functions such as:\n\n- Offering a standard location to listen to device updates\n- Offering a standard location to listen to context data updates\n- Holding a list of devices and mapping context data attributes to device syntax\n- Security Authorization\n\nThis base functionality has been abstracted out into a common\n[IoT Agent framework library](https://iotagent-node-lib.readthedocs.io/)\n\n#### Device Monitor\n\nFor the purpose of this tutorial, a series of dummy IoT devices have been created, which will be attached to the context\nbroker. Details of the architecture and protocol used can be found in the\n[IoT Sensors tutorial](https://github.com/FIWARE/tutorials.IoT-Sensors) The state of each device can be seen on the JSON\ndevice monitor web page found at: `http://localhost:3000/device/monitor`\n\n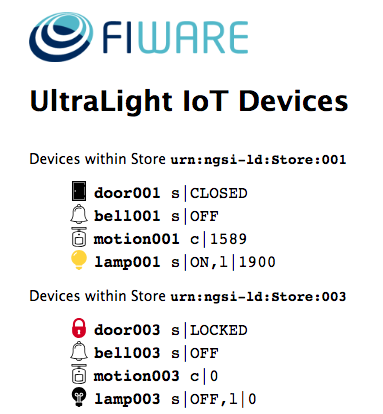\n\n# Architecture\n\nThis application builds on the components created in\n[previous tutorials](https://github.com/FIWARE/tutorials.Subscriptions/). It will make use of one FIWARE component - the\n[Orion Context Broker](https://fiware-orion.readthedocs.io/en/latest/) plus a **Custom IoT Agent for XML**. Usage of the\nOrion Context Broker is sufficient for an application to qualify as _“Powered by FIWARE”_. Both the Orion Context Broker\nand the IoT Agent and rely on open source [MongoDB](https://www.mongodb.com/) technology to keep persistence of the\ninformation they hold. We will also be using the dummy IoT devices created in the\n[previous tutorial](https://github.com/FIWARE/tutorials.IoT-Sensors/), however they have been already been adapted to\nrespond to the custom XML messaging format.\n\nTherefore the overall architecture will consist of the following elements:\n\n- The FIWARE [Orion Context Broker](https://fiware-orion.readthedocs.io/en/latest/) which will receive requests using\n [NGSI-v2](https://fiware.github.io/specifications/OpenAPI/ngsiv2)\n- The **Custom IoT Agent for XML** which will receive southbound requests using\n [NGSI-v2](https://fiware.github.io/specifications/OpenAPI/ngsiv2) and convert them to XML commands for the devices\n- The underlying [MongoDB](https://www.mongodb.com/) database :\n - Used by the **Orion Context Broker** to hold context data information such as data entities, subscriptions and\n registrations\n - Used by the **IoT Agent** to hold device information such as device URLs and Keys\n- A webserver acting as set of [dummy IoT devices](https://github.com/FIWARE/tutorials.IoT-Sensors) using the custom\n XML messaging protocol running over HTTP.\n\nSince all interactions between the elements are initiated by HTTP requests, the entities can be containerized and run\nfrom exposed ports.\n\n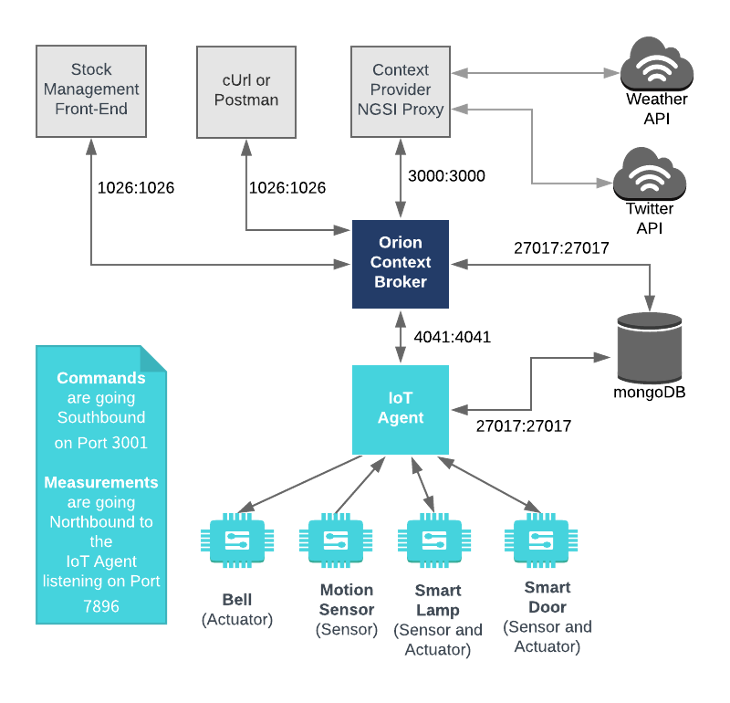\n\nThe necessary configuration information for wiring up the IoT devices and the IoT Agent can be seen in the services\nsection of the associated `docker-compose.yml` file:\n\n## Dummy IoT Devices Configuration\n\n```yaml\ntutorial:\n image: fiware/tutorials.context-provider\n hostname: iot-sensors\n container_name: fiware-tutorial\n networks:\n - default\n expose:\n - \"3000\"\n - \"3001\"\n ports:\n - \"3000:3000\"\n - \"3001:3001\"\n environment:\n - \"DEBUG=tutorial:*\"\n - \"PORT=3000\"\n - \"IOTA_HTTP_HOST=iot-agent\"\n - \"IOTA_HTTP_PORT=7896\"\n - \"DUMMY_DEVICES_PORT=3001\"\n - \"DUMMY_DEVICES_API_KEY=4jggokgpepnvsb2uv4s40d59ov\"\n - \"DUMMY_DEVICES_TRANSPORT=HTTP\"\n - \"DUMMY_DEVICES_PAYLOAD=XML\"\n```\n\nThe `tutorial` container is listening on two ports:\n\n- Port `3000` is exposed so we can see the web page displaying the Dummy IoT devices.\n- Port `3001` is exposed purely for tutorial access - so that cUrl or Postman can make JSON commands without being\n part of the same network.\n\nThe `tutorial` container is driven by environment variables as shown:\n\n| Key | Value | Description |\n| ----------------------- | ---------------------------- | ---------------------------------------------------------------------------------------------------------------------------------- |\n| DEBUG | `tutorial:*` | Debug flag used for logging |\n| WEB_APP_PORT | `3000` | Port used by web-app which displays the dummy device data |\n| IOTA_HTTP_HOST | `iot-agent` | The hostname of the IoT Agent for JSON - see below |\n| IOTA_HTTP_PORT | `7896` | The port that the IoT Agent for JSON will be listening on. `7896` is a common default for JSON over HTTP |\n| DUMMY_DEVICES_PORT | `3001` | Port used by the dummy IoT devices to receive commands |\n| DUMMY_DEVICES_API_KEY | `4jggokgpepnvsb2uv4s40d59ov` | Random security key used for IoT interactions - used to ensure the integrity of interactions between the devices and the IoT Agent |\n| DUMMY_DEVICES_TRANSPORT | `HTTP` | The transport protocol used by the dummy IoT devices |\n| DUMMY_DEVICES_PAYLOAD | `XML` | The message payload protocol by the dummy IoT devices |\n\nThe other `tutorial` container configuration values described in the YAML file are not used in this tutorial.\n\n## Custom XML IoT Agent configuration\n\nThe code for the custom XML IoT Agent can be found within the\n[GitHub Repository](https://github.com/FIWARE/tutorials.Custom-IoT-Agent/tree/master/iot-agent) associated to this\ntutorial. It is a copy of the 1.12.0 version of the IoT Agent for Ultralight, lightly modified as described below. The\nassociated [Dockerfile](https://github.com/FIWARE/tutorials.Custom-IoT-Agent/blob/master/iot-agent/Dockerfile) merely\ncopies the code into an appropiate location within a Docker container running Node.js. This allows the component to be\ninstansiated using a `docker-compose.yaml` file. The necessary configuration can be seen below:\n\n```yaml\niot-agent:\n image: fiware/iotagent-xml\n build:\n context: iot-agent\n dockerfile: Dockerfile\n hostname: iot-agent\n container_name: fiware-iot-agent\n depends_on:\n - mongo-db\n networks:\n - default\n expose:\n - \"4041\"\n - \"7896\"\n ports:\n - \"4041:4041\"\n - \"7896:7896\"\n environment:\n - IOTA_CB_HOST=orion\n - IOTA_CB_PORT=1026\n - IOTA_NORTH_PORT=4041\n - IOTA_REGISTRY_TYPE=mongodb\n - IOTA_LOG_LEVEL=DEBUG\n - IOTA_TIMESTAMP=true\n - IOTA_CB_NGSI_VERSION=v2\n - IOTA_AUTOCAST=true\n - IOTA_MONGO_HOST=mongo-db\n - IOTA_MONGO_PORT=27017\n - IOTA_MONGO_DB=iotagentjson\n - IOTA_HTTP_PORT=7896\n - IOTA_PROVIDER_URL=http://iot-agent:4041\n - IOTA_DEFAULT_RESOURCE=/iot/xml\n```\n\nThe `iot-agent` container relies on the precence of the Orion Context Broker and uses a MongoDB database to hold device\ninformation such as device URLs and Keys. The container is listening on two ports:\n\n- Port `7896` is exposed to receive JSON measurements over HTTP from the Dummy IoT devices\n- Port `4041` is exposed purely for tutorial access - so that cUrl or Postman can make provisioning commands without\n being part of the same network.\n\nThe `iot-agent` container is driven by environment variables as shown:\n\n| Key | Value | Description |\n| --------------------- | ----------------------- | ----------------------------------------------------------------------------------------------------------------------------------------------------- |\n| IOTA_CB_HOST | `orion` | Hostname of the context broker to update context |\n| IOTA_CB_PORT | `1026` | Port that context broker listens on to update context |\n| IOTA_NORTH_PORT | `4041` | Port used for Configuring the IoT Agent and receiving context updates from the context broker |\n| IOTA_REGISTRY_TYPE | `mongodb` | Whether to hold IoT device info in memory or in a database |\n| IOTA_LOG_LEVEL | `DEBUG` | The log level of the IoT Agent |\n| IOTA_TIMESTAMP | `true` | Whether to supply timestamp information with each measurement received from attached devices |\n| IOTA_CB_NGSI_VERSION | `v2` | Whether to supply use NGSI v2 when sending updates for active attributes |\n| IOTA_AUTOCAST | `true` | Ensure JSON number values are read as numbers not strings |\n| IOTA_MONGO_HOST | `context-db` | The hostname of mongoDB - used for holding device information |\n| IOTA_MONGO_PORT | `27017` | The port mongoDB is listening on |\n| IOTA_MONGO_DB | `iotagentjson` | The name of the database used in mongoDB |\n| IOTA_HTTP_PORT | `7896` | The port where the IoT Agent listens for IoT device traffic over HTTP |\n| IOTA_PROVIDER_URL | `http://iot-agent:4041` | URL passed to the Context Broker when commands are registered, used as a forwarding URL location when the Context Broker issues a command to a device |\n| IOTA_DEFAULT_RESOURCE | `/iot/xml` | The default path the IoT Agent uses listenening for custom XML measures. |","schema":"https://schema.getpostman.com/json/collection/v2.0.0/collection.json","isPublicCollection":true,"owner":"513743","team":157450,"collectionId":"a25317b1-5952-4a35-9730-21c65a6dcc52","publishedId":"Szzn6c2L","public":true,"publicUrl":"https://documenter-api.postman.tech/view/513743/Szzn6c2L","privateUrl":"https://go.postman.co/documentation/513743-a25317b1-5952-4a35-9730-21c65a6dcc52","customColor":{"top-bar":"FFFFFF","right-sidebar":"303030","highlight":"45D3DD"},"documentationLayout":"classic-double-column","customisation":null,"version":"8.12.0","publishDate":"2020-06-19T15:09:04.000Z","activeVersionTag":"latest","documentationTheme":"light","metaTags":{},"logos":{}},"statusCode":200},"environments":[],"user":{"authenticated":false,"permissions":{"publish":false}},"run":{"button":{"js":"https://run.pstmn.io/button.js","css":"https://run.pstmn.io/button.css"}},"web":"https://www.getpostman.com/","team":{"logo":"https://res.cloudinary.com/postman/image/upload/t_team_logo_pubdoc/v1/team/d7085d490b9144732c65203aa6e3b68b31884d1c33a86b8a00d15da75147ae33","favicon":""},"isEnvFetchError":false,"languages":"[{\"key\":\"csharp\",\"label\":\"C#\",\"variant\":\"HttpClient\"},{\"key\":\"csharp\",\"label\":\"C#\",\"variant\":\"RestSharp\"},{\"key\":\"curl\",\"label\":\"cURL\",\"variant\":\"cURL\"},{\"key\":\"dart\",\"label\":\"Dart\",\"variant\":\"http\"},{\"key\":\"go\",\"label\":\"Go\",\"variant\":\"Native\"},{\"key\":\"http\",\"label\":\"HTTP\",\"variant\":\"HTTP\"},{\"key\":\"java\",\"label\":\"Java\",\"variant\":\"OkHttp\"},{\"key\":\"java\",\"label\":\"Java\",\"variant\":\"Unirest\"},{\"key\":\"javascript\",\"label\":\"JavaScript\",\"variant\":\"Fetch\"},{\"key\":\"javascript\",\"label\":\"JavaScript\",\"variant\":\"jQuery\"},{\"key\":\"javascript\",\"label\":\"JavaScript\",\"variant\":\"XHR\"},{\"key\":\"c\",\"label\":\"C\",\"variant\":\"libcurl\"},{\"key\":\"nodejs\",\"label\":\"NodeJs\",\"variant\":\"Axios\"},{\"key\":\"nodejs\",\"label\":\"NodeJs\",\"variant\":\"Native\"},{\"key\":\"nodejs\",\"label\":\"NodeJs\",\"variant\":\"Request\"},{\"key\":\"nodejs\",\"label\":\"NodeJs\",\"variant\":\"Unirest\"},{\"key\":\"objective-c\",\"label\":\"Objective-C\",\"variant\":\"NSURLSession\"},{\"key\":\"ocaml\",\"label\":\"OCaml\",\"variant\":\"Cohttp\"},{\"key\":\"php\",\"label\":\"PHP\",\"variant\":\"cURL\"},{\"key\":\"php\",\"label\":\"PHP\",\"variant\":\"Guzzle\"},{\"key\":\"php\",\"label\":\"PHP\",\"variant\":\"HTTP_Request2\"},{\"key\":\"php\",\"label\":\"PHP\",\"variant\":\"pecl_http\"},{\"key\":\"powershell\",\"label\":\"PowerShell\",\"variant\":\"RestMethod\"},{\"key\":\"python\",\"label\":\"Python\",\"variant\":\"http.client\"},{\"key\":\"python\",\"label\":\"Python\",\"variant\":\"Requests\"},{\"key\":\"r\",\"label\":\"R\",\"variant\":\"httr\"},{\"key\":\"r\",\"label\":\"R\",\"variant\":\"RCurl\"},{\"key\":\"ruby\",\"label\":\"Ruby\",\"variant\":\"Net::HTTP\"},{\"key\":\"shell\",\"label\":\"Shell\",\"variant\":\"Httpie\"},{\"key\":\"shell\",\"label\":\"Shell\",\"variant\":\"wget\"},{\"key\":\"swift\",\"label\":\"Swift\",\"variant\":\"URLSession\"}]","languageSettings":[{"key":"csharp","label":"C#","variant":"HttpClient"},{"key":"csharp","label":"C#","variant":"RestSharp"},{"key":"curl","label":"cURL","variant":"cURL"},{"key":"dart","label":"Dart","variant":"http"},{"key":"go","label":"Go","variant":"Native"},{"key":"http","label":"HTTP","variant":"HTTP"},{"key":"java","label":"Java","variant":"OkHttp"},{"key":"java","label":"Java","variant":"Unirest"},{"key":"javascript","label":"JavaScript","variant":"Fetch"},{"key":"javascript","label":"JavaScript","variant":"jQuery"},{"key":"javascript","label":"JavaScript","variant":"XHR"},{"key":"c","label":"C","variant":"libcurl"},{"key":"nodejs","label":"NodeJs","variant":"Axios"},{"key":"nodejs","label":"NodeJs","variant":"Native"},{"key":"nodejs","label":"NodeJs","variant":"Request"},{"key":"nodejs","label":"NodeJs","variant":"Unirest"},{"key":"objective-c","label":"Objective-C","variant":"NSURLSession"},{"key":"ocaml","label":"OCaml","variant":"Cohttp"},{"key":"php","label":"PHP","variant":"cURL"},{"key":"php","label":"PHP","variant":"Guzzle"},{"key":"php","label":"PHP","variant":"HTTP_Request2"},{"key":"php","label":"PHP","variant":"pecl_http"},{"key":"powershell","label":"PowerShell","variant":"RestMethod"},{"key":"python","label":"Python","variant":"http.client"},{"key":"python","label":"Python","variant":"Requests"},{"key":"r","label":"R","variant":"httr"},{"key":"r","label":"R","variant":"RCurl"},{"key":"ruby","label":"Ruby","variant":"Net::HTTP"},{"key":"shell","label":"Shell","variant":"Httpie"},{"key":"shell","label":"Shell","variant":"wget"},{"key":"swift","label":"Swift","variant":"URLSession"}],"languageOptions":[{"label":"C# - HttpClient","value":"csharp - HttpClient - C#"},{"label":"C# - RestSharp","value":"csharp - RestSharp - C#"},{"label":"cURL - cURL","value":"curl - cURL - cURL"},{"label":"Dart - http","value":"dart - http - Dart"},{"label":"Go - Native","value":"go - Native - Go"},{"label":"HTTP - HTTP","value":"http - HTTP - HTTP"},{"label":"Java - OkHttp","value":"java - OkHttp - Java"},{"label":"Java - Unirest","value":"java - Unirest - Java"},{"label":"JavaScript - Fetch","value":"javascript - Fetch - JavaScript"},{"label":"JavaScript - jQuery","value":"javascript - jQuery - JavaScript"},{"label":"JavaScript - XHR","value":"javascript - XHR - JavaScript"},{"label":"C - libcurl","value":"c - libcurl - C"},{"label":"NodeJs - Axios","value":"nodejs - Axios - NodeJs"},{"label":"NodeJs - Native","value":"nodejs - Native - NodeJs"},{"label":"NodeJs - Request","value":"nodejs - Request - NodeJs"},{"label":"NodeJs - Unirest","value":"nodejs - Unirest - NodeJs"},{"label":"Objective-C - NSURLSession","value":"objective-c - NSURLSession - Objective-C"},{"label":"OCaml - Cohttp","value":"ocaml - Cohttp - OCaml"},{"label":"PHP - cURL","value":"php - cURL - PHP"},{"label":"PHP - Guzzle","value":"php - Guzzle - PHP"},{"label":"PHP - HTTP_Request2","value":"php - HTTP_Request2 - PHP"},{"label":"PHP - pecl_http","value":"php - pecl_http - PHP"},{"label":"PowerShell - RestMethod","value":"powershell - RestMethod - PowerShell"},{"label":"Python - http.client","value":"python - http.client - Python"},{"label":"Python - Requests","value":"python - Requests - Python"},{"label":"R - httr","value":"r - httr - R"},{"label":"R - RCurl","value":"r - RCurl - R"},{"label":"Ruby - Net::HTTP","value":"ruby - Net::HTTP - Ruby"},{"label":"Shell - Httpie","value":"shell - Httpie - Shell"},{"label":"Shell - wget","value":"shell - wget - Shell"},{"label":"Swift - URLSession","value":"swift - URLSession - Swift"}],"layoutOptions":[{"value":"classic-single-column","label":"Single Column"},{"value":"classic-double-column","label":"Double Column"}],"versionOptions":[],"environmentOptions":[{"value":"0","label":"No Environment"}],"canonicalUrl":"https://documenter.gw.postman.com/view/metadata/Szzn6c2L"}